Got an old server lying around? Does it have some storage left in it? Why not turn it into an iSCSI box!
iSCSI stands for Internet Small Computer Systems Interface, a protocol for linking storage devices over the network.
This is especially fun for old systems, because it doesnt require much processing to work well.
This also applies but most old servers, but tested on this massive Dell especially.
The system in question:
This system is quite the beast for 2003:
Containing two hyperthreaded Xeons from the Pentium 4 age plus 1GB of RAM. More would be nice but the type of RAM it uses has become quite expensive. They are notorious and certainly well known for being slow and hot.
Here is a rundown of the setup:

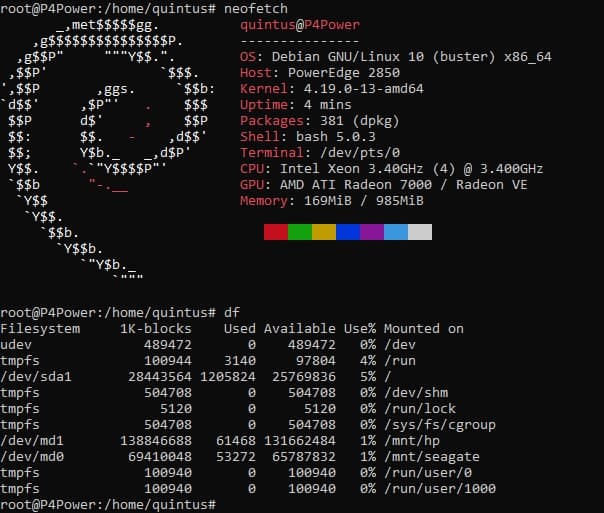
This screen shows Neofetch and df, showing system hardware and storage.
This system contains one of the early x64 capable CPU’s from Intel. (Full page here) Meaning it runs all the modern stuff without compatibility issues or out of date support.
So two of these power hungry processors, a single gigabyte of RAM. and on the front bay 6 SCSI drive bays. Each in theory capable of pushing 320MB/sec.
The storage is devided in two:
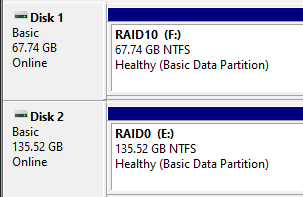
One array has four 36.7GB Seagate hard disks at a staggering 15 thousand revolutions per minute. Then two HP drives with double the capacity.
Debian runs off an USB stick, so that all drives in the front can be used to their full potential.
The Seagate drives run in an RAID 10. This splits the data over two drives, giving a doubling is write and read performance. Then, these two are copied again which gives redundancy in case one drive fails.
Then, the HP drives are of double the capacity and run in RAID 0. This splits the data over two drives as well, giving double the performance. One problem being, if one drive starts to fail, all data is lost instantly.
iSCSI setup:
iSCSI talks to drives directly, so by following the tutorial found at this place and modifing it a bit I set the two arrays seperate. Meaning you can now find the two arrays on the network with no performance loss. (Minus the network’s bandwidth of course.)
Note: The tutorial gives a too short password for the ‘share’, make sure you change it for something between 12 and 16 characters.
The RAID 0 and 10 arrays can then be opened in any machine via supplied password. In my case I wanted Windows, which works as follows.
You can open the iSCSI ‘client’ aka Initator via “%windir%\system32\iscsicpl.exe”. Paste this into the Run box (also accessible via the Windows key + R) and push OK. At first launch, it will ask you to enable the service, click yes and re-open.
Now, if your server had the iSCSI target side running as mentioned in previous tutorial, you can simply push Refresh and they will pop up.
To login, select your device, Connect > Advanced > Tick the CHAP login to enabled, enter your password and done! It should now say “Connected”.

Now, go into Disk Management, (You can do Windows key + X then Disk Management).
It will prompt you what to format the new disk with. Format it, and it will pop up in My Computer! That’s all you need.
Performance:
Now here’s where it gets interesting. Remember, it’s a server from 2004 talking to a system from 2020.
Data transfer:


For a couple real-world examples of what data transfer would look like:
FLAC music files: (~30MB each)
The RAID10 array finished in ~51,66 seconds over 3 measurements of 5.8GB.
The RAID0 array finished in ~46,33 seconds over 3 measurements of 5.8GB.
Random JPG images: (~3MB each)
The RAID10 array finished in ~43,33 seconds over 3 measurements of 4.0GB.
The RAID0 array finished in ~39,66 seconds over 3 measurements of 4.0GB.
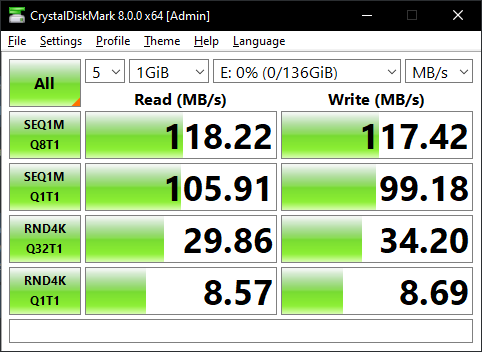
Notice the RAID 0 setup being faster with sequential transfers.
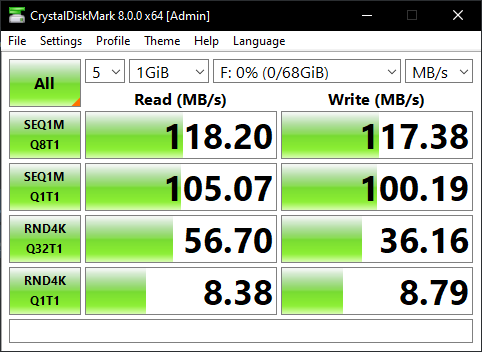
Processor usage hovered around 30 to 40 percent, so you could have a max of 3 users working. If your network can take the load, of course. Then the RAID 10 has it’s benefits as well. Look at the CrystalDiskMark screenshots. RND4K means random files of 4K. It’s double the speed of RAID 0. Keeping this in mind, I also tested game loading times.
Gaming:
This has to be the most amazing thing of all. It’s game improvements. Look at F1 2015 for instance:
Standard 2TB external HDD via USB:
Load times (cold start): 55 seconds
Average FPS: 126 / Highest FPS: 155
Then look at this:
Over the network via iSCSI RAID 10:
Load times (cold start): 17 seconds
Average FPS: 127 / Highest FPS: 159
That’s more then a tripling in loading speed! This game used to take between 2 to 4 minutes on a normal system to load. Yet iSCSI and the server’s buffers make it so much faster!
Due to the small size of F1 2015 and the small disk space (just 64GB) I could not test many games with long load times to show differences. Yet, SSD’s are fairly normal now too for games so tested that as well.
Local SSD:
Load times (cold start): 19 seconds
Average FPS: 126 / Highest FPS: 156
Yeap, its just a tad slower. Not by much! But iSCSI is still faster. And here is why I think this is happening.
Conclusion:
Old servers with SCSI controllers or similar usually have some RAM on them to speed up the random access times. This is similar to how Intel Optane, which are small SSD’s to act as a cache work. The same applies here, the RAM acts as a very fast cache for the fairly ‘slow’ hard drives.
Now, by running them over iSCSI with controller assisted access, (which Debian does by default) you in theory give games a small but very fast cache to load assets from they want the most. Combine that with the speed of 4 drives working together, and you get an overall latency and workload that is lower then even a local SSD over SATA.
So, if you have an old system lying around with similar hardware to this, I highly recommend to try this for yourself and see what denefits you can get!
Thanks for reading!

Interesting stuff. I had no idea iSCSI would work on a box from ~2003