Super Audio CD’s are a complex medium, but can provide much more to your listening experience if done right. Playing them from the internet is a whole different question.
If you want your own SACD library to work over the internet there is one way that could work anywhere you will need a very specific set of software and maybe hardware. The setup is as follows:
- Linux server:
In this case Debian, this will run the streamer software and do all the nessary hosting work. - Subsonic:
The media streamer in question, yes it is freemium works work well for what it needs to do. - An URL, free or paid:
An URL (such as example.com) will be needed for HTTPS, which will be provided via Let’s Encrypt. - Web hosting software:
We will be using Nginx for ease of use in setting the redirection and proxy which will be the tunnel to Subsonic. - Storage:
We will be splitting the SACD rips into files, so be sure you can enough storage! (~2x your collection size)
So first thing will be the Linux server itself. As mentioned above we will be using Debian and NGINX for the hosting.
These can be set up fairly easily. But this article is for SACD streaming so you can look on Google or any search engine for ‘How to set up Debian and NGINX with Let’s Encrypt” or similar. If you are hsoting from home, look into Port Forwarding as well.
Subsonic Installation:
Now, you should have your working URL, a test page and a running Linux server system.
The rest should be fairly straight forward. So, first install Subsonic from the website or via the following two commands.
wget -q -O ./subsonic.deb "https://s3-eu-west-1.amazonaws.com/subsonic-public/download/subsonic-6.1.6.deb"
dpkg --force-confold --force-confdef -i ./subsonic.deb
After that’s done, you can check if it is active via “sudo service subsonic status”. The following should highlight ‘running’ in green text. If so, nice! If not, no skip this part. Now you will need to stop it via “sudo service subsonic stop” as we will need some make some adjustments.
Open your favorite text editor and open “/etc/default/subonic”. I promairly use nano, so if you dont know any ‘nano /etc/default/subsonic’ will do the trick. The desired changes are: increase –max-memory to 512 or more, –port at 4040 and I have –https-port at 8443. Which will then look like:
SUBSONIC_ARGS="--max-memory=2048 --port=4040 --https-port=8443"You may also wanted to change SUBSONIC_USER=root to your own username for security purposes.
Setting up access to the web application:
NGINX’s files are located in /etc/nginx. In this case, we will want to edit (if you left everything at default) ‘/etc/nginx/sites-enabled/default’.
Now, here you go to thre bottom of the configuration file, but above the last } bracket. Now enter the following:
   location / {
        proxy_set_header X-Frame-Options 'ALLOW-FROM https://yoursitehere.com';
        proxy_pass https://127.0.0.1:8443;
        proxy_set_header Host $host;
        proxy_set_header X-Real-IP $remote_addr;
        proxy_set_header X-Forwarded-For $proxy_add_x_forwarded_for;
        add_header X-Frame-Options SAME-ORIGIN;
   }
Notices two things you must check:
Change the https://yoursitehere.com reference with your own address. This will allow subsonic’s menu to load in correctly, even on a subdomain.
And the ‘proxy_pass https://127.0.0.1:8443’ might need a change. After the :, use the same port you chose when we edited the /etc/default/subsonic file.
Now, reload NGINX (Test with ‘nginx -t’ first, and THEN ‘nginx -s reload’!) and visit your address. Subsonic should pop up! Set up your admin user as the site will guide you. (Recommended: use a different name for your main account and change the admin password to something really strong).
Allowing SACD track files in Subsonic:
First, we do not want Subsonic to mess with our files, so head to Settings > Transcoding and deleted every rule.
Now for latting Subsonic recognise our new high fidelity files. Go to Settings, General and look at the first line. “Music files”, to the right is a text box. Add the following two file types. “dff dsf”. These are the two file types for SACD-formatted music. Also known as DSD. Now when you scan for new files, these two formats will be picked up and added to your library.
See below for what it should represent:

Getting the files to be played back.
These two will not work in your browser, so now we will change the player.
Subsonic can make playlist files on the fly so we will choose an external player with playlist functionality. My preferred player to do this with is Foobar2000.
Install Foobar2000 first, choose your desired layout and colors. Now you will need the plugin to actually play back SACD media. This can be found at its sourceforge site. Unzip the downloaded file, and click on the two files that begin with “foo_”. These are foobar plugins, so Foobar will open and ask if you want to add this plugin. Select yes for both, then click apply. Foobar2000 will restart, and ask for administrator rights so it can associate the files we want to playt locally.
Now with the player and required decoder, we can turn back to Subsonic. Go to Settings > Players> Select the newest player and change it to “External player with playlist”. This will now make a playlist file with every song you want to play. Open it with foobar, and if all works well the file will now begin to play!
This will work for all music types, and will result in higher quality playback right out of the box compared to browser playback.
Setting up your media:
Now, we want to add our SACD media to Subsonic for streaming, so go to Settings > Media Folders and create a library. File location is directly on your server, so for instance you can use “/home/yourusernamehere/Music/” or similar.
The file types we added earlier will be picked up in the folder you entered there.
If you have discs, you will need a way to copy them via SACD ripping, but that can be quite the expensive journey. Instead, find an alternative place to get a copy of your disc. (These are mostly in ISO format). ISO files are a direct 1-to-1 copy of your disc, so they will have to be split into files for streaming. For instance: this page.
Our streamable files are in DSF or DFF format. Choose DSF when you can because it supports things like adding artist names and song names. DFF on the other hand does not support these metadata.
Testing the setup:
Now, you should have DSF or DFF files of the music you want to play, a working Subsonic site and Foobar2000 with plugins.
So for the last step, add your music files to the location you eneterd in Subsonic as your library, click on “Scan media folders now”, wait until it finishes. Go back to Home, and your albums will pop up. Open one, and click on the play icon for the desired song. A playlist file will pop up, select open with Foobar2000 and the music will play!
This setup now works anywhere in the world, not only in your own network.
Getting the most out of your new SACD media:
Your music now plays from anywhere you want, that’s awesome! But you can get more out of it.
The first is setting the playback frequency. So in Foobar2000, go to: Library > Configure > Tools > SACD.
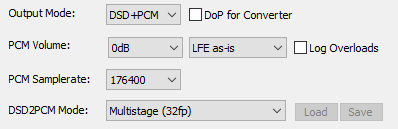
Change the settings on your right to the ones above, and you should notice an immidiate difference. If it gives you errors, change the PCM Samplerate to 44100. This will work on all PC’s from the 90’s and newer. 🙂
My last time is to get a Digital To Analog Converter with DSD support. DSD is the format SACD uses, and using a sound device, (Mostly referred to as a DAC) will ensure you get the most out of your SACD files by not needing to change the format on the fly. Read more here on what DAC’s do and why they matter. I personally recommend the “ifi Hip-Dac”, also mentioned in mentioned link.
Conclusion:
Congrats! You how have your own high fidelity streaming service with whatever you want to play, from anywhere in the world, with extra SACD support to boot!
I hope you enjoy this setup as much as we do here on United & Co!